Obsidian Quick-Start Guide
From First Note to a Networked Knowledge System


Foreword: A Philosophical Start to Your Obsidian Journey
Welcome to Obsidian. It’s more than just a note-taking app; it’s a space to build a personal knowledge base that grows with you and reflects how you actually think. You might have heard terms like "Second Brain," the idea of offloading information to a trusted system to free up your mental energy for creative thinking, problem-solving, and connecting ideas. While that's a powerful goal, it's easy to look at complex systems online and feel overwhelmed by the possibilities before you've even written a single word.
Don't be. Think of Obsidian as a modular knowledge system you are assembling one Lego brick at a time. A single note, like a single brick, may not seem like much on its own. The magic happens when you start connecting them. Each note you write is a brick, and each link you make is the satisfying snap of connecting it to another. Your job isn't to be an architect with a perfect blueprint; it's to be a builder. Lay the first brick by capturing a thought. Then lay the next by linking it to a related idea. Over time, these simple pieces will form a complex, unique structure you couldn't have possibly planned from the start.
The most important step is the first one: just start writing. What should you write? Anything. A summary of an article, a fleeting thought, notes from a meeting, a recipe. The initial goal is not to create a masterpiece, but to build the habit of capturing ideas.
There's no rush to build the perfect system. Take as much time as you need and let your knowledge structure evolve naturally as you add more notes. The temptation to spend hours installing plugins and tweaking settings before you have any content is a common trap called "setup hell." It puts the focus on the tool, not the thinking. The most powerful system is one that is built slowly, thoughtfully, and becomes an extension of your own mind. This mindset will help you focus on what truly matters: writing and connecting ideas.
Before you begin, a quick note: searching for "Obsidian" may lead you to Obsidian Entertainment, a well-known video game developer. The correct website for the note-taking app is here.
The full Obsidian Help documentation is very helpful to bookmark for later and/or follow along with.
Part I: The First 15 Minutes—From Download to Your First Note
The initial setup of Obsidian is simple and minimal, enabling new users to start creating content right away. This approach reflects the app’s core philosophy: prioritize ideas first, organization second.
Step 1: Download the Correct Version.
Obsidian is free to use, with optional paid add-ons, and supports a wide range of devices.
Step 2: Create Your Vault
When you first open Obsidian, you’ll be prompted to create a vault. A vault is simply a folder on your device that stores all your notes as plain text files. This local storage approach distinguishes Obsidian from many cloud-based note-taking apps by giving you full control over your data.
You can create a new vault by either making a new empty folder or selecting an existing folder to use as your vault. The latter is helpful if you already have notes or documents you want to integrate into Obsidian. Choose a vault location that’s easy to find and organize, as it will serve as the central hub for all your notes. *NOTE: If you place your vault inside a sync folder like Google Drive, DO NOT use Obsidian Sync too. You have to pick one or the other to avoid sync conflicts and potential data loss.*
Step 3: Create Your First Note Using Markdown
With your vault set up, you’re ready to create your first note. Press `Ctrl+N` (Windows/Linux) or `Cmd+N` (macOS) to open a new blank note.
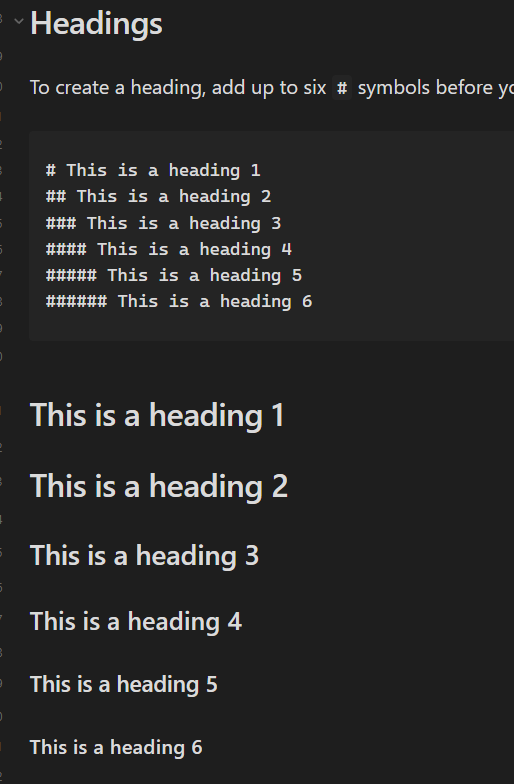
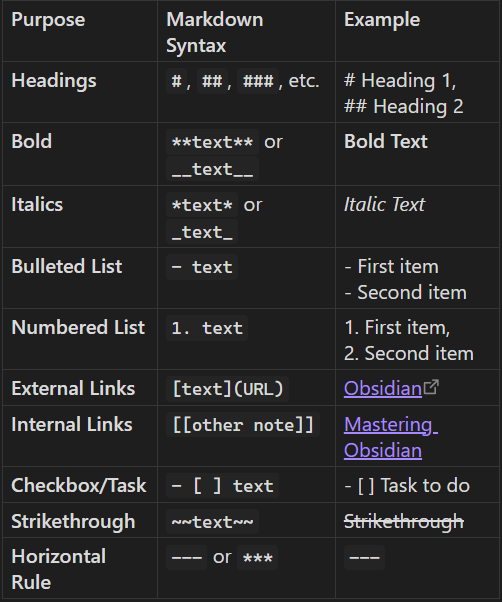
Obsidian’s editor uses Markdown, a simple syntax for formatting plain text. While it may sound technical, Markdown is intuitive and easy to read even without formatting applied. Unlike rich-text editors, Markdown keeps your writing environment clean and distraction-free. Below is a quick reference for essential Markdown commands to help you get started.
To learn more about markdown, including additional commands/syntax, please review:
Part II: The Power of Connection: Linking Notes and Files
While creating and formatting notes is fundamental, Obsidian’s real strength lies in its ability to link notes together. This transforms a collection of separate files into a dynamic, interconnected web of ideas.
Bidirectional Linking: The `[[ ]]` Feature
One of Obsidian’s most powerful features is its use of bidirectional links, created using `[[double brackets]]`, commonly called Wikilinks. These links allow you to connect notes seamlessly, transforming your collection of individual files into a dynamic, interconnected knowledge network.
How to Create Internal Links
One of Obsidian's most powerful features is its use of bidirectional links, created using `[[double brackets]]`. When you create a link from Note A to Note B, Obsidian automatically tracks this connection. In Note B, you can see a backlink to Note A, showing all notes that reference it. This helps you discover relationships and context you might otherwise miss.
You can even link to notes that don't exist yet. Typing a new note name inside `[[ ]]` creates a placeholder link, which you can later click to create the new note.
Example:
While writing about "Newton's Laws of Motion," you might type `[[Isaac Newton]]` to link to a note on him that you plan to create later. This reduces cognitive friction by allowing you to jot down connections as they come to mind, building your knowledge base organically over time.
Advanced Linking Features
Link to Headings: You can link directly to a specific heading within a note by appending `#Heading Name` inside the brackets, e.g., `[[Isaac Newton#Biography]]`.
Link to Blocks: Obsidian supports linking to specific blocks (paragraphs, list items, quotes) using block IDs, enabling precise references.
Custom Link Text: You can customize how a link appears by using a pipe `|`, e.g., `[[Isaac Newton|Sir Isaac Newton]]` will display as "Sir Isaac Newton" but link to the "Isaac Newton" note.
Aliases: For consistent alternate names, you can define aliases inside a note’s front matter, allowing you to link using different terms without manually customizing each link.
Bidirectional linking with `[[ ]]` is the core of Obsidian’s power. It encourages you to think in connections, not silos, and helps your knowledge base grow naturally and meaningfully.
Aliases: Referencing Notes by Different Names
In Obsidian, aliases allow you to reference a single note using multiple alternative names throughout your vault. This is especially useful for acronyms, nicknames, translations, or any other variant names you might want to use when linking to the same note.
Why Use Aliases?
- To simplify linking by using shorter or more familiar terms (e.g., linking to “Artificial Intelligence” as “AI”).
- To accommodate different languages or terminology for the same concept.
- To maintain consistent links even if you use different names in different contexts.
How to Add Aliases
Aliases are added as a list in the YAML front matter (Properties) at the top of your note. For example:
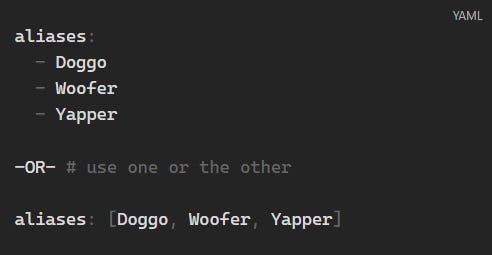
This note titled “Dog” can now be linked to using any of the aliases: `[[Doggo]]`, `[[Woofer]]`, or `[[Yapper]]`.
Linking Using Aliases
When you start typing an alias inside `[[ ]]`, Obsidian’s autocomplete will suggest the note with a curved arrow icon indicating it’s an alias. Selecting it creates a link that uses the alias as the display text but points to the original note.
For example, linking to the note “Artificial Intelligence” using the alias “AI” will create a link like this in Markdown:

This ensures that the link points correctly to the original note while displaying the alias text.
Finding Unlinked Mentions of Aliases
Obsidian’s Backlinks pane also recognizes aliases. If you have mentions of an alias (e.g., “AI”) in your vault that are not yet linked, you can find them and convert those mentions into proper internal links pointing to the original note. This helps maintain a consistent and connected knowledge base.
Summary
Use aliases to create multiple reference names for a single note.
Add aliases in the YAML front matter as a list under the `aliases` property.
Link to notes using any alias, and Obsidian will handle the correct linking and display.
Use aliases to improve linking flexibility and reduce friction when referencing notes.
Backlinks: Discovering Your Connections
Once links are established, Obsidian’s backlink feature shows which notes link back to the current note. Opening the backlinks pane reveals all references to the note, uncovering connections you might have forgotten or overlooked. This acts as a helpful reminder of related information, enriching your understanding of each topic.
Visualizing Your Network: The Graph View
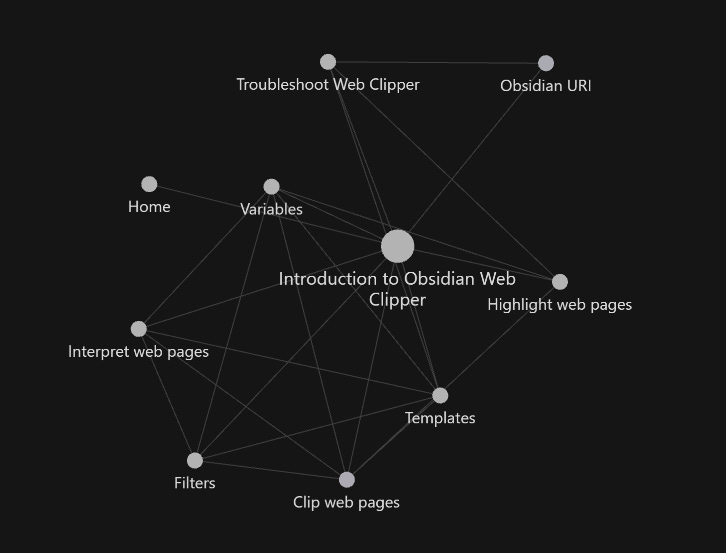
The Graph View plugin offers a visual map of your entire note network. In this interactive display, circles (nodes) represent notes, and lines show the links between them.
Beyond aesthetics, the Graph View helps you explore your knowledge base. You can identify clusters of closely connected notes, revealing thematic concentrations, or spot "orphan notes"—those without any links—and integrate them into your network. The graph’s customizable forces, like `Repel force` and `Link force`, adjust how notes cluster visually, helping you discover new relationships and patterns. This visual representation reflects your intellectual landscape, providing a unique tool for self-analysis and insight.
Part III: Building Your System—Organization and Optimization
As your vault grows, organizing your notes becomes essential. Among Obsidian users, the use of folders, tags, and links often sparks lively debate. New users should know there’s no single “right” way to organize notes. Instead, the best approach is to understand the strengths and limitations of each tool and use them together effectively.
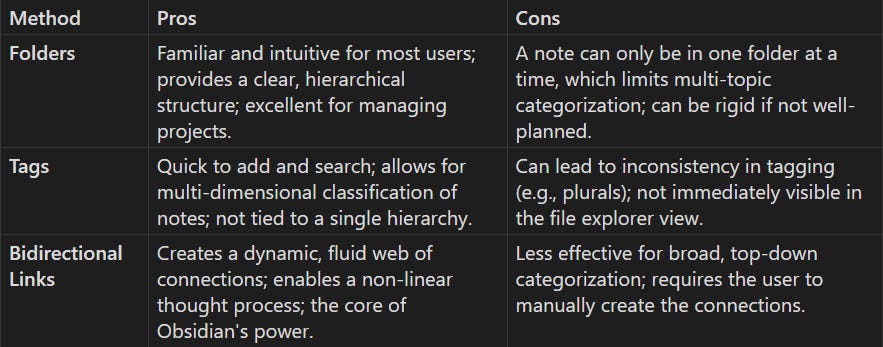
Folders, Tags, and Links: Understanding Their Roles
Folders offer a hierarchical, one-dimensional way to organize notes, similar to traditional computer file systems. They work well for managing distinct projects—like articles or video scripts—where all related notes can be stored in one place. However, a key limitation is that a note can only reside in one folder at a time, which can be restrictive if the note relates to multiple topics.
Tags, marked by the `#` symbol, provide a more flexible, multi-dimensional way to classify notes. A single note can have multiple tags, allowing it to belong to various categories. For example, a note about a software tool might be tagged `#software` and `#productivity`. Tags are useful for quick filtering and tracking note status. However, inconsistent tagging—such as using both `#dog` and `#dogs`—can create confusion and reduce their effectiveness.
Rather than choosing between folders and tags, the most effective strategy is to use them complementarily. Use folders to establish a broad, hierarchical structure (for example, `Projects`, `Areas`, `Resources`, and `Archives`), while tags provide flexible, thematic classification. Links then act as dynamic connections between notes, enabling non-linear exploration of ideas beyond any fixed organizational scheme.
The following table compares these organizational tools:
Expanding Your Toolkit: Plugins and Themes
Obsidian’s functionality expands significantly through its ecosystem of plugins and themes. Core plugins are built-in features you can enable or disable, such as Graph View, Daily Notes, and Templates. Community plugins, developed by other users, add thousands of additional capabilities, including advanced search, project management tools, and spaced repetition—a technique for improving memory by reviewing information at increasing intervals.
While having many options is beneficial, it can also cause decision paralysis, where users spend more time configuring their setup than actually using it. To avoid this, start with a minimal setup and add plugins only when a specific need arises in your workflow. This gradual, needs-based approach helps prevent “setup hell” and keeps your focus on creating content rather than perfecting your tools.
Finally, always back up your vault—the folder where your notes are stored—especially before making major changes or updating plugins. This ensures your data remains safe in case something goes wrong.
Conclusion: Your Next Steps and Building a Living System
Getting started with Obsidian lays the groundwork for developing a personal knowledge base that grows over time. Remember, this system isn’t a fixed project to perfect but a dynamic extension of your own thinking. Its structure will naturally evolve as you add more notes and create connections between ideas.
Here’s a quick checklist to guide your first steps:
Create a vault, which is a local folder where all your notes are stored.
Create your first note by pressing `Ctrl+N` (Windows) or `Cmd+N` (Mac).
Link a second note to the first using the `[[double bracket]]` syntax, which creates connections between notes.
Explore the Graph View to visualize how your notes (nodes) are linked.
For users ready to expand beyond the basics, Obsidian offers several options for syncing and sharing your vault. Obsidian Sync is a secure, encrypted service that keeps your notes synchronized across devices. Alternatively, you can use cloud storage services like iCloud, Google Drive, or OneDrive, or tools like Syncthing or Git for manual or self-hosted synchronization. To protect your locally-stored data, it is critical to setup a backup system right away.
If you want to share your knowledge publicly, Obsidian Publish lets you create an online wiki or digital garden directly from your vault’s notes. By starting with a simple, needs-focused setup and leveraging linked thinking, you can turn Obsidian into a powerful tool for organizing your thoughts, enhancing memory, and fostering creativity.
Bonus 1: Web Viewer!
Use Obsidian to keep track of notes about how to use Obsidian.
Go to your Settings (gear icon in lower left) -> Core Plugins -> Turn on Web Viewer from Core Plugins.
Open a new tab at the top of the page. Click "Open Web Viewer."
Open Basic Formatting Syntax (https://help.obsidian.md/syntax) directly inside Obsidian in the Web Viewer.
Click the 3 vertical dots to the right of the address bar. Select "Save to Vault."
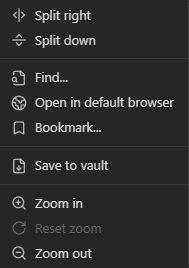
Now, you have a guide to markdown in markdown right inside your shiny new Obsidian Vault!
(Note: my vault has line numbering turned on. This is optional.)